Launching an Instance
Overview
Teaching: 45 min
Exercises: 0 minQuestions
Let’s launch an instance
Objectives
Review all launch options
Launch a virtual machine and connect to it with ssh
The steps to launch a virtual machine
This lesson will step you through the process of launching a virtual machine (VM) on Nimbus. You will be making decisions on the specifications of your VM and finally using a terminal to logon to your VM. When you are doing this for the first time it can seem like a lot of information to take in before you can start a VM. As you become more familiar with this process it will become less intimidating.
It is easy to forget a step or misconfigure required elements. The result maybe errors on starting the VM, or you may be unable to connect once the VM is up and running. If this happens, don’t worry (we’ve all made the same mistakes when we were getting started). If you’re working through this lesson with an instructor, she or he can come and advise you on where you might have gone wrong. Whether you are working through this in a class, or by yourself, we find that (usually) the easiest fix is to delete the VM and make a new one, paying close attention to each step.
OK, let’s get started…
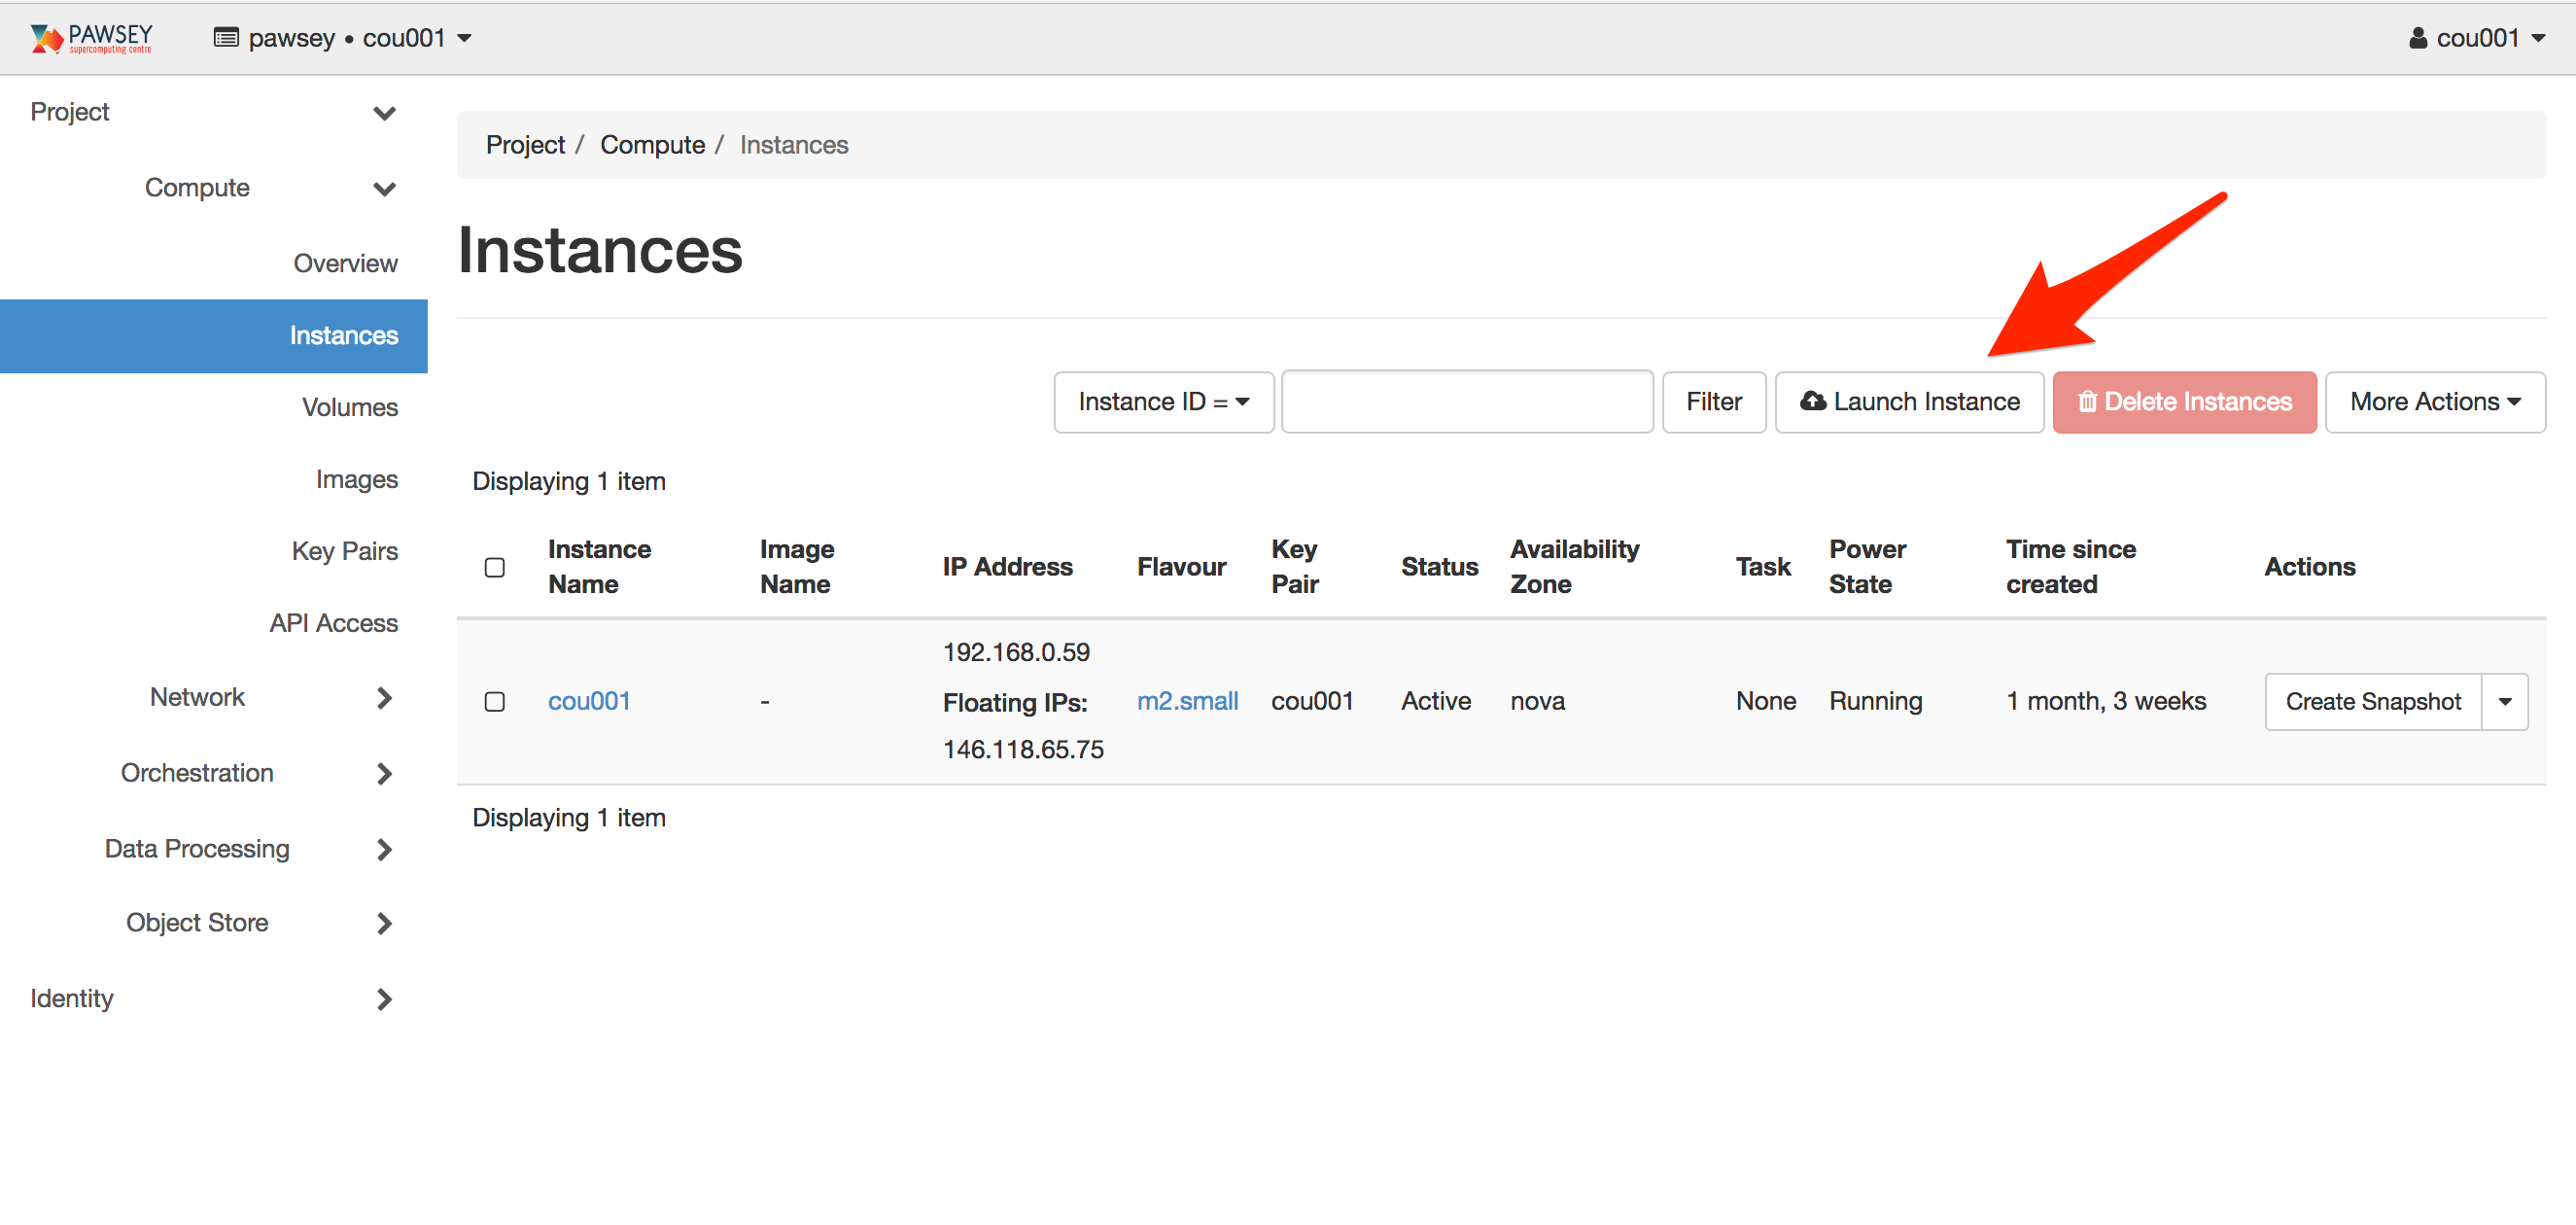
From the left hand menu select ‘Compute’ then ‘Instances’. Click on the ‘Launch Instance’ button
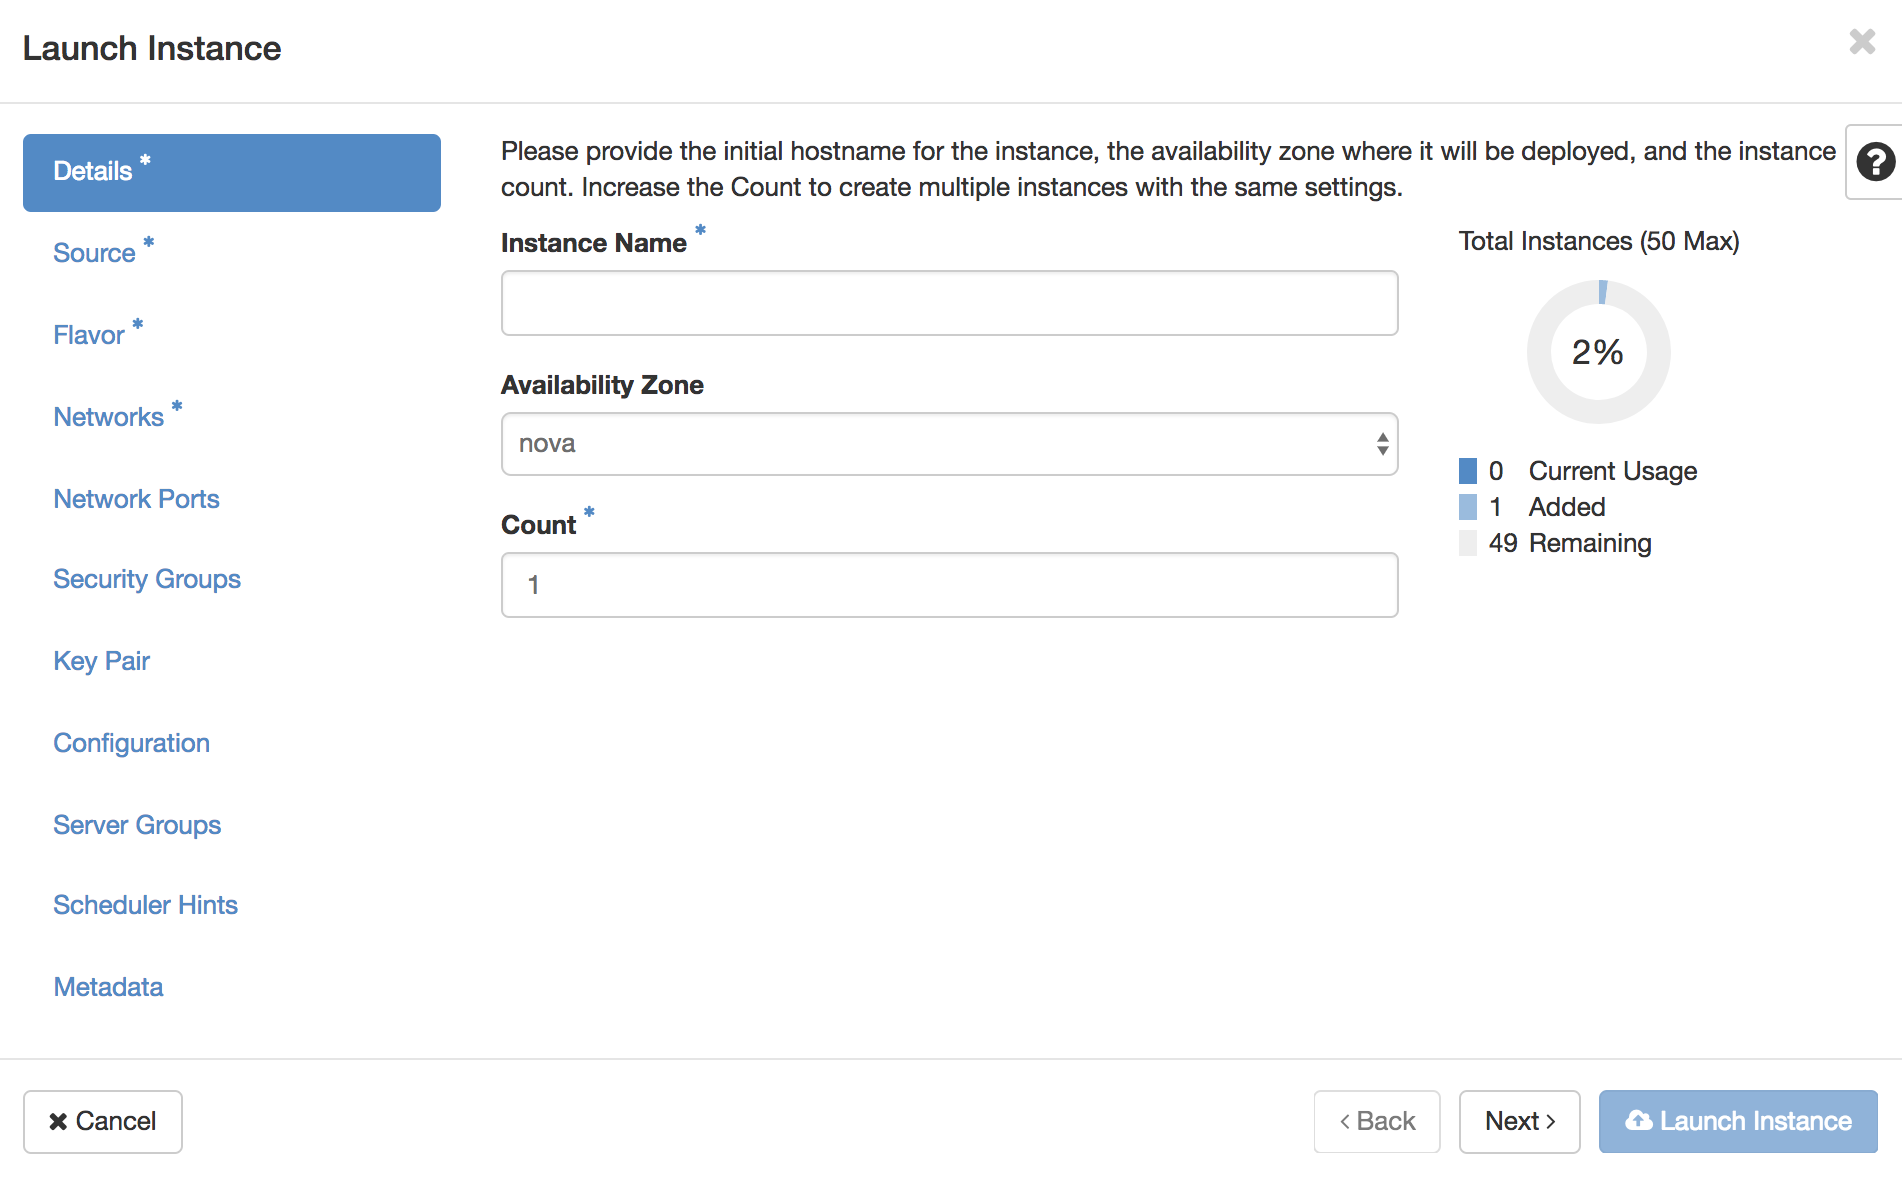
1. Set a name
The first step is to give your VM a name. It doesn’t matter what you call it, usually we recommend giving your VM a name related to the task it will be performing.
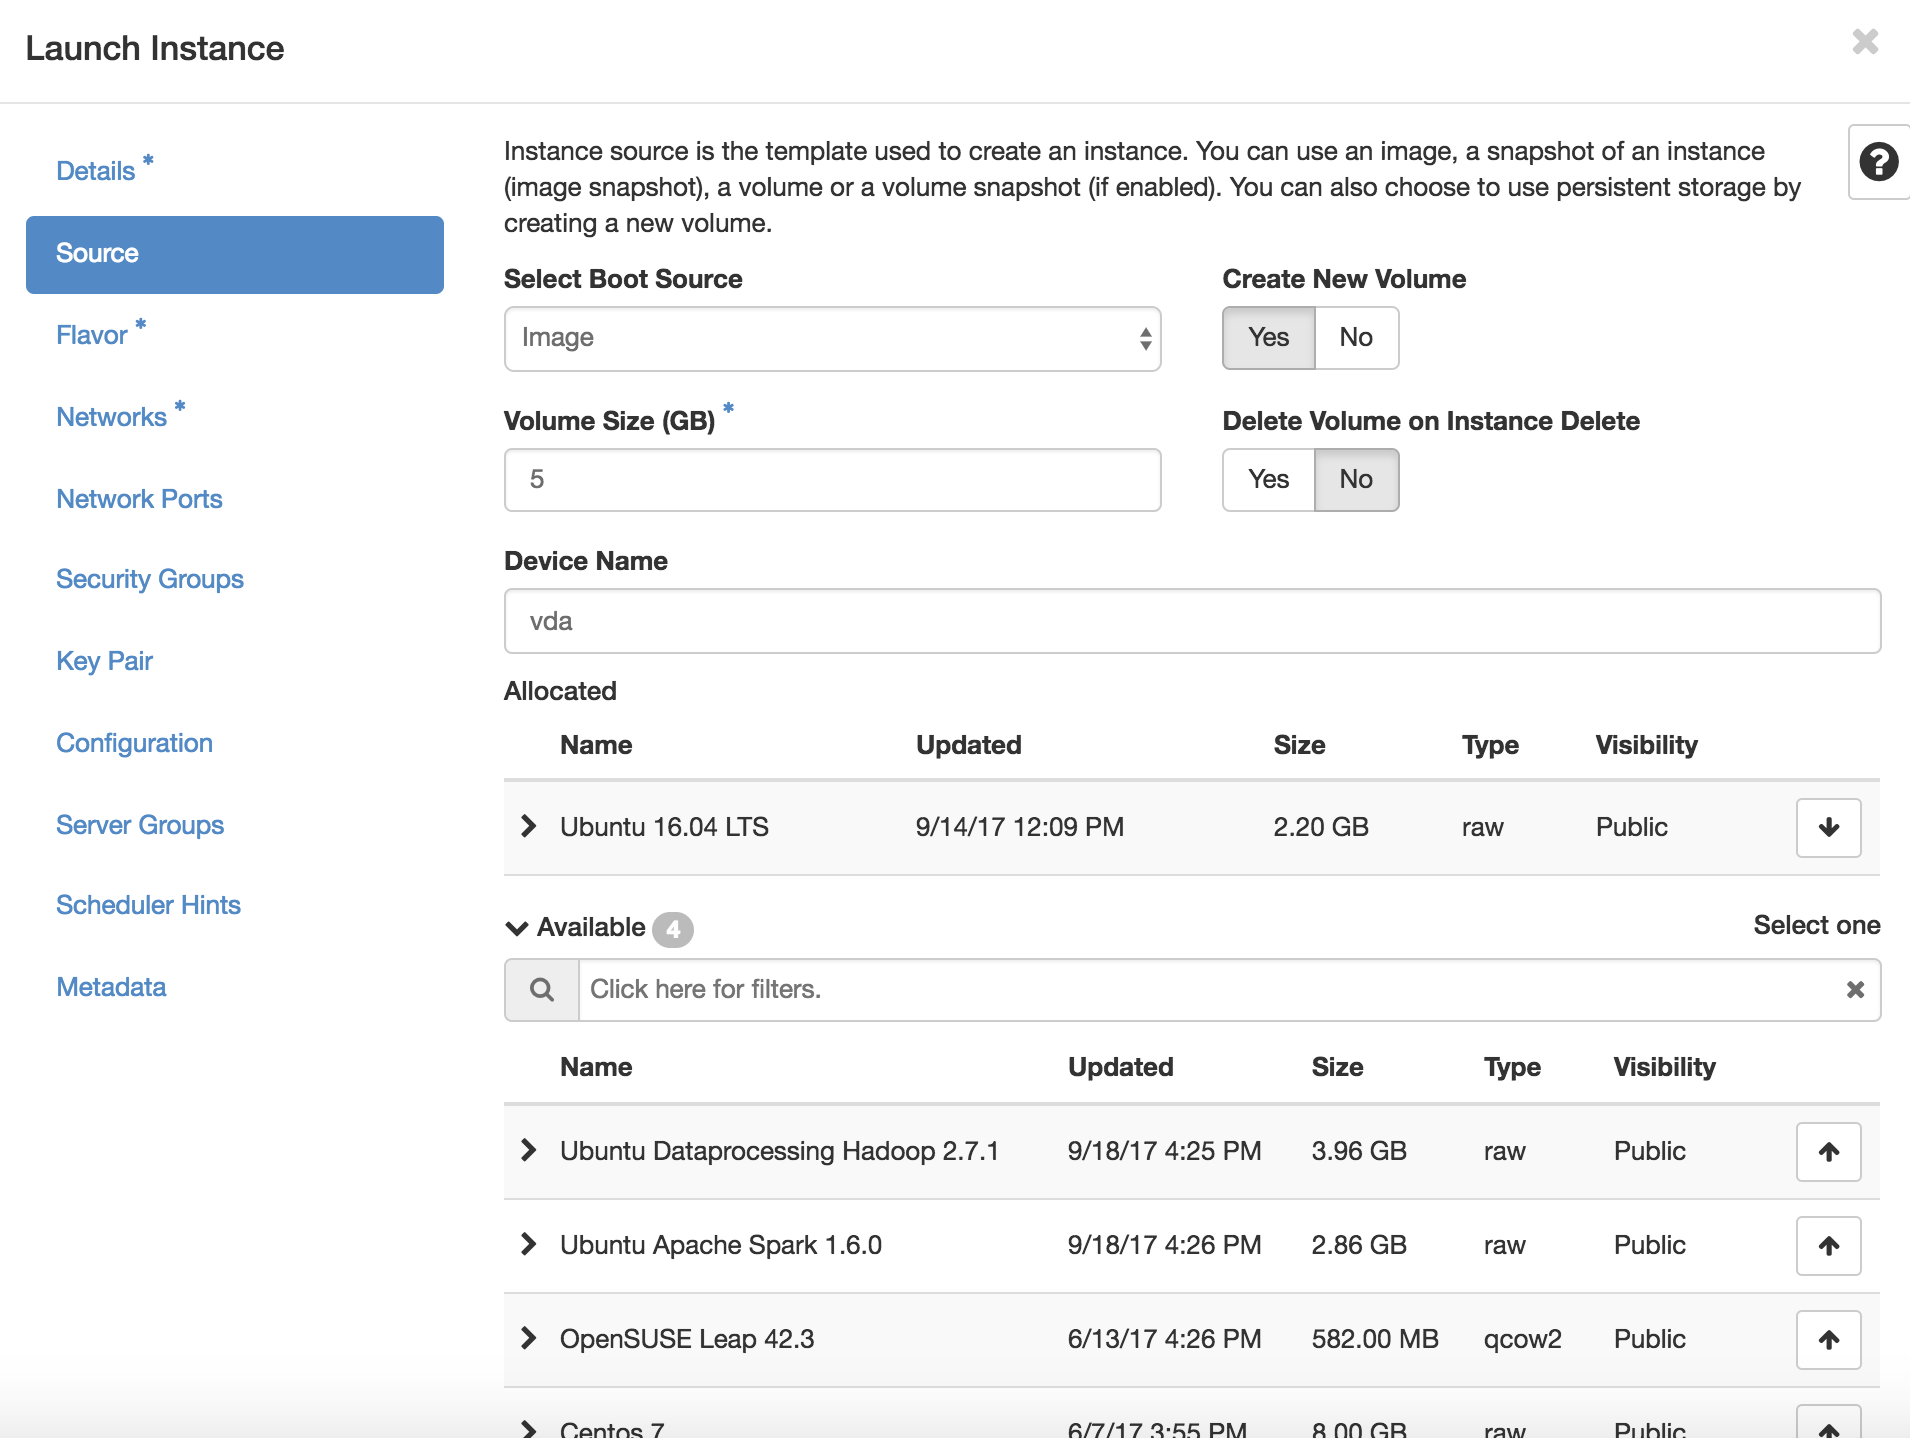
2. Choose a source image
The selection of the Source Image defines the operating system that will be used to launch your VM.
First make sure that Boot Source is set to “Image”, and Volume Size is set to 5GB (You can modify the boot size later, before you first launch the VM). “Delete Volume on Instance Delete” should set to Yes.
Delete Volume on Instance Delete?
We usually suggest that you set this to YES. It will result in the volume used for your VM to be deleted if you delete your VM, but this is a good thing.
For training purposes you will launch a VM using the “Ubuntu LTS 16.04” image. Click the up-arrow to the right of the image name so that it is listed under “allocated”.
You will note that there are other images you can select. Some of these are visible, but not intended for individual user deployment (the Hadoop or Spark images). We do support the Ubuntu LTS 16.04 and Centos 7 image for you to run VMs.
If you need a specific flavour of Linux and you find that it is not listed you do have another option; it is possible to import external images, but our support for you in this instance will be very limited.
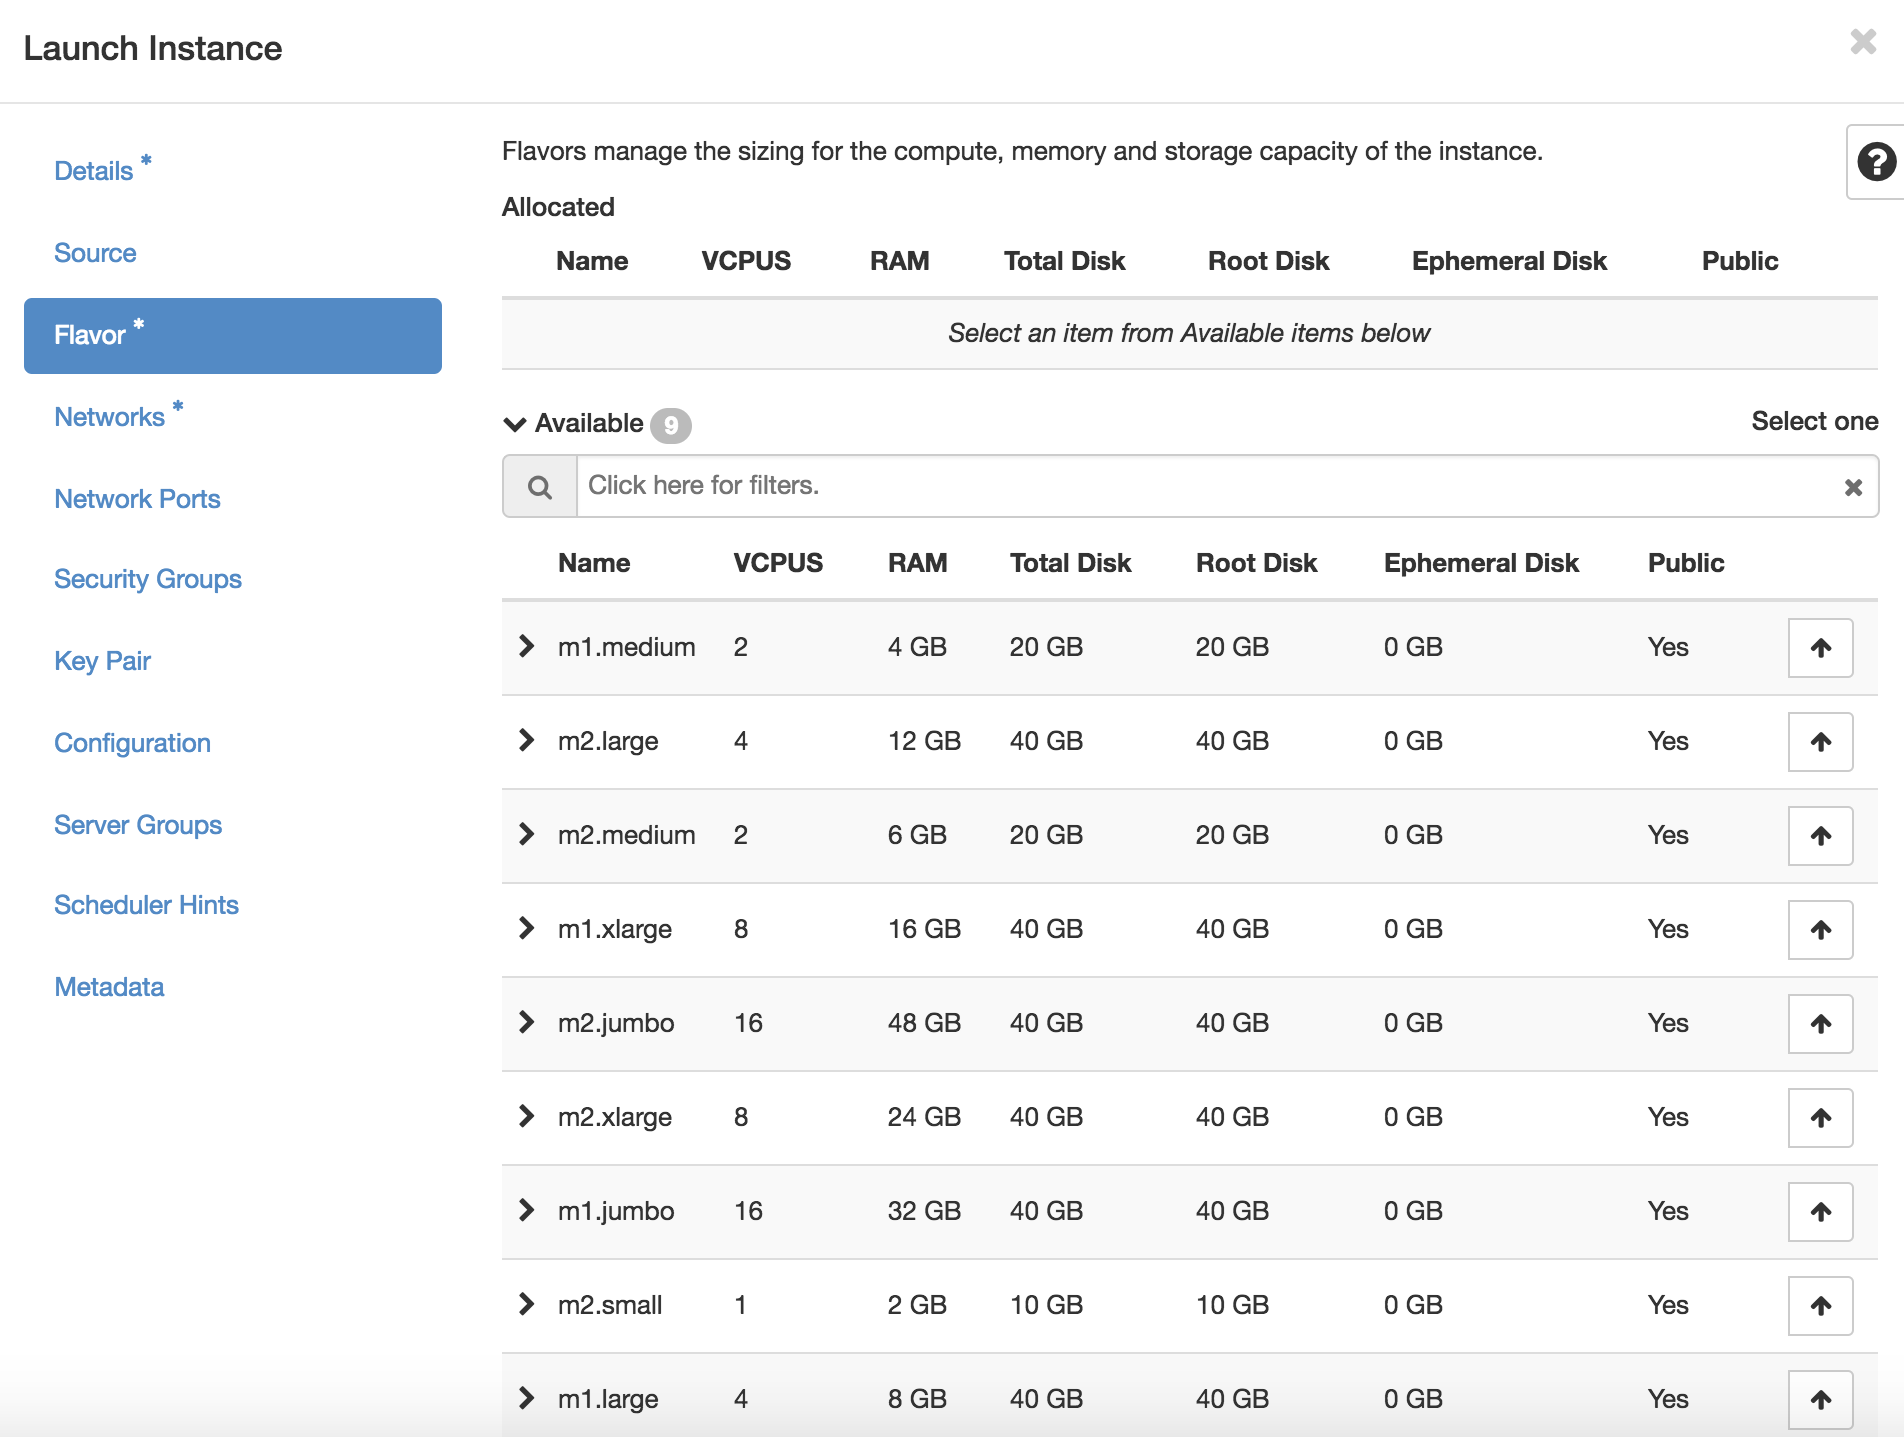
3. Select a flavour
A ‘flavour’ (or ‘flavor’ because our software prefers US spelling) defines the characteristics of a VM. We provide a range of flavours that vary based on the number of cores available to your VM.
If you’re at a training event, then select m2.small. If you’re self-learning, choose any flavour that you wish.
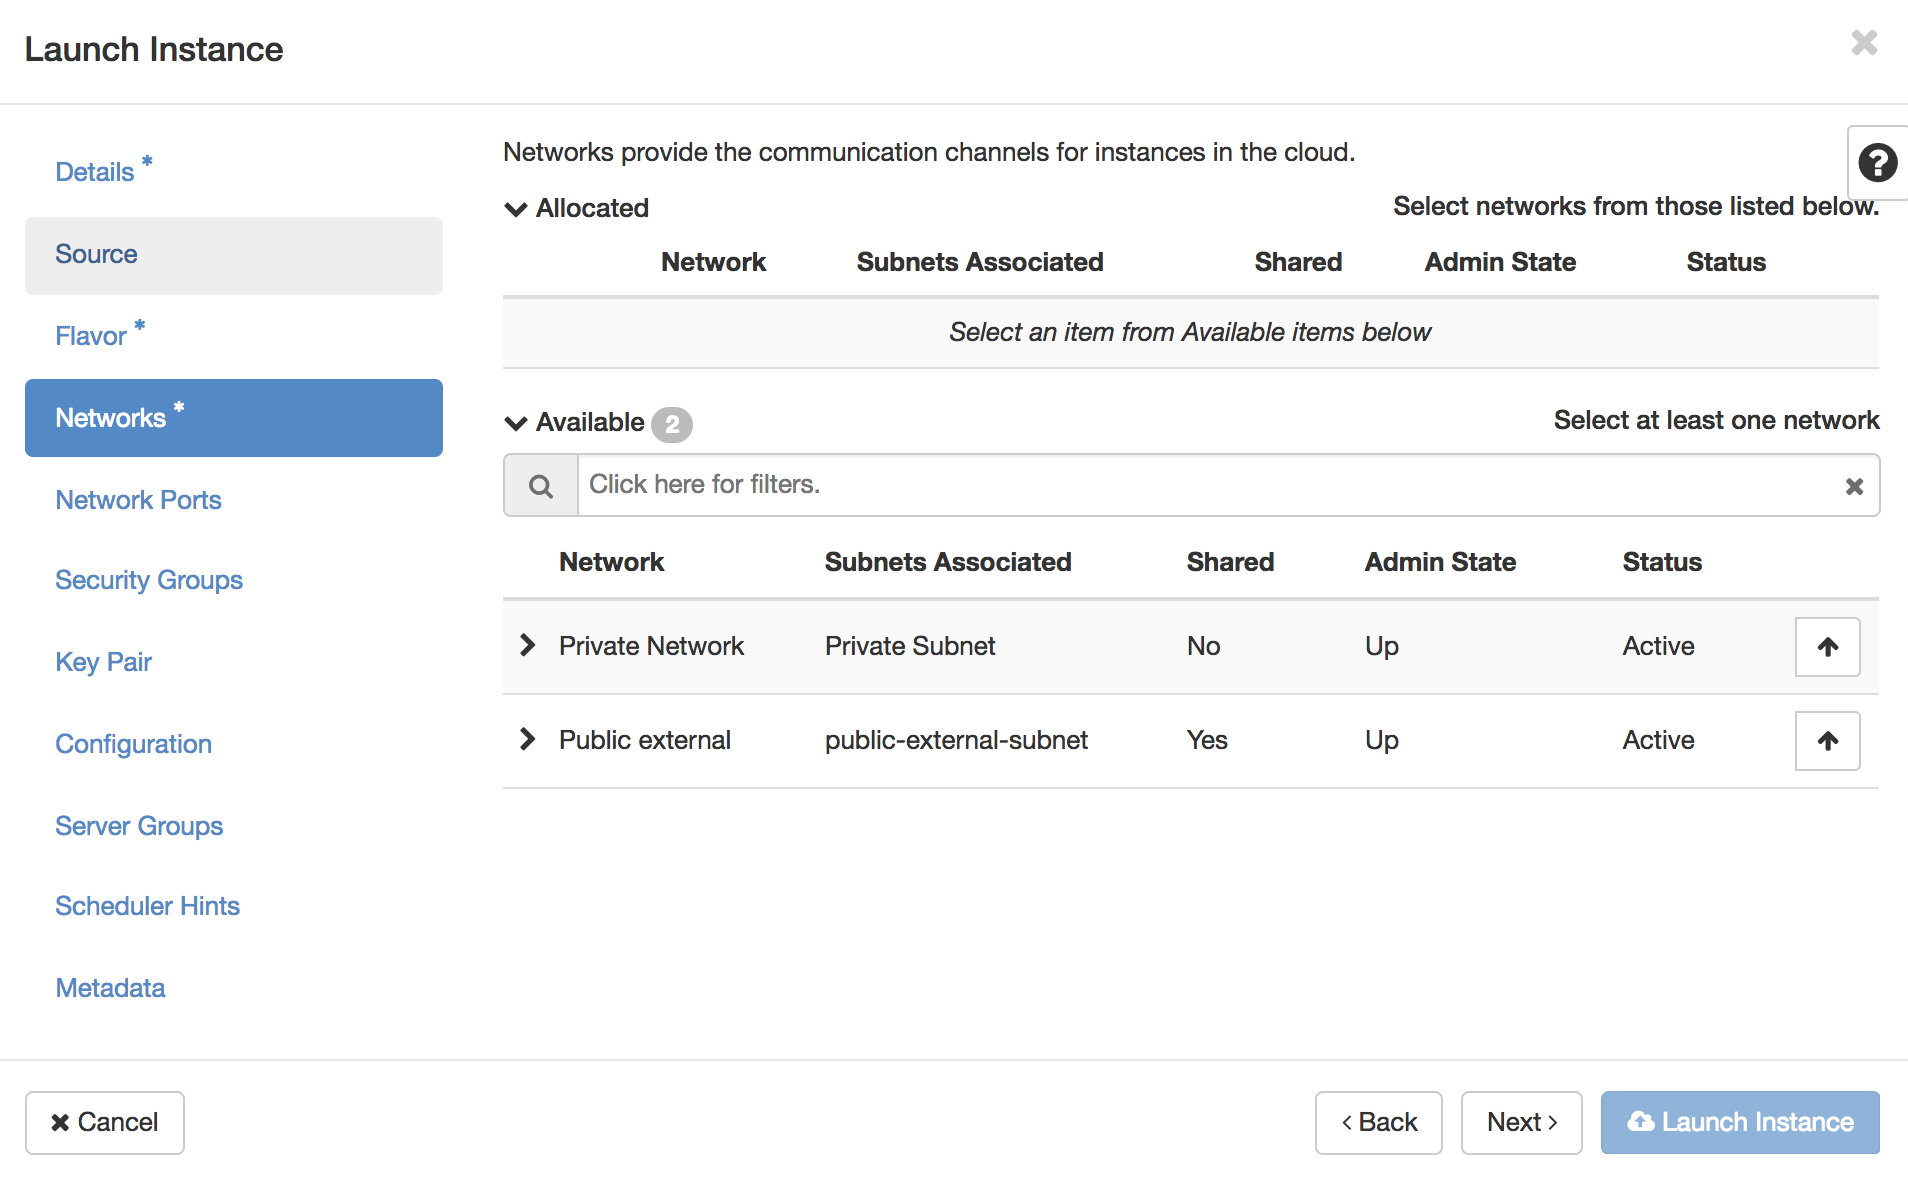
4. Select a network
The network tab is where you will define the networking available to your VM.
Nimbus projects have networking prepared for you. Using a training project you will select the Private Network. If you are using your own project you will see a network name similar to this.
You will also see a public external network. You may be thinking that you might use this, since you are seeking external network access. This will not work however, since this network is outside your router and cannot be used to get access to the wider internet.
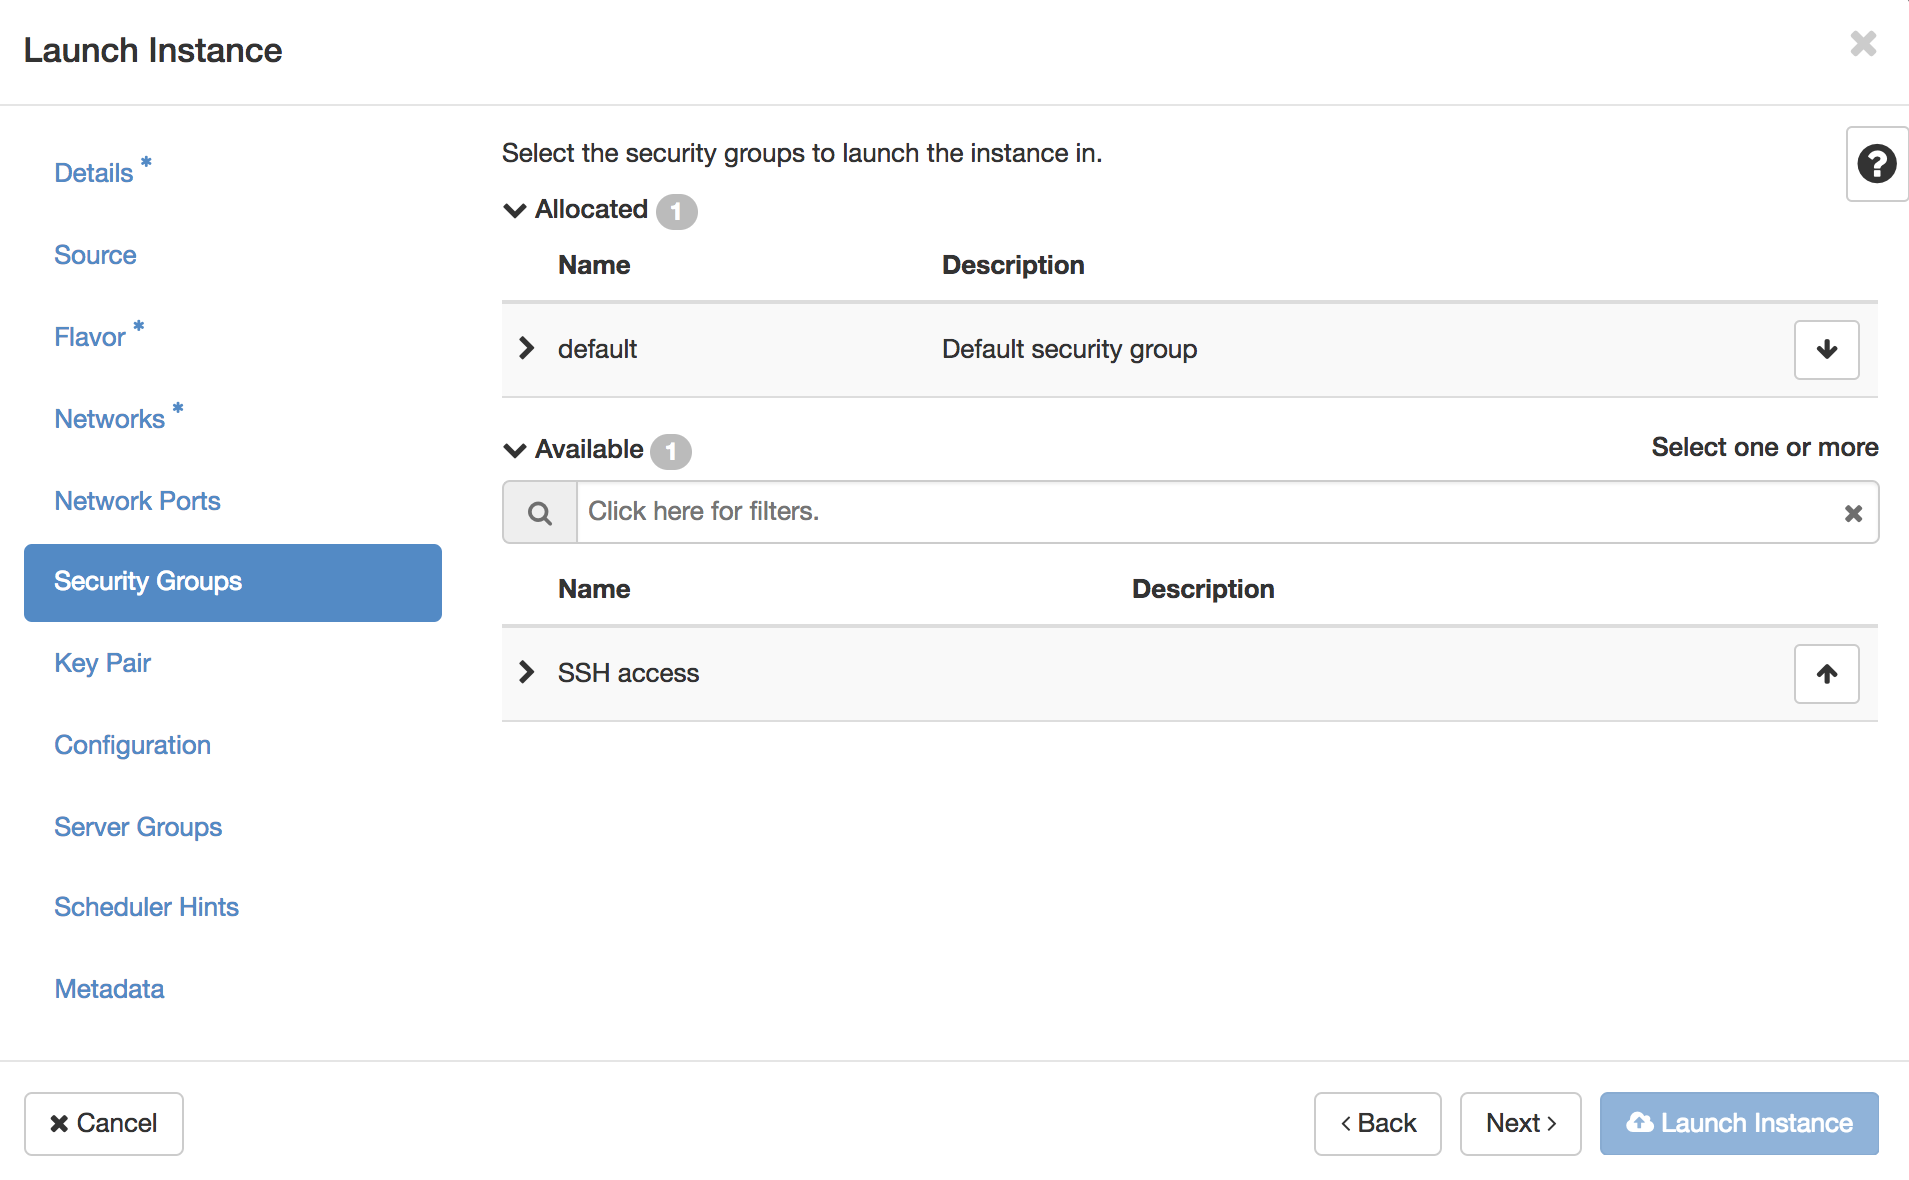
5. Check security groups (include previously created SSH access)
Nimbus projects are preconfigured with a security group to permit SSH access. This is required by most users. The security group to add is SSH Access. If you have look at this security group you will see
6. Click on “Launch Instance”
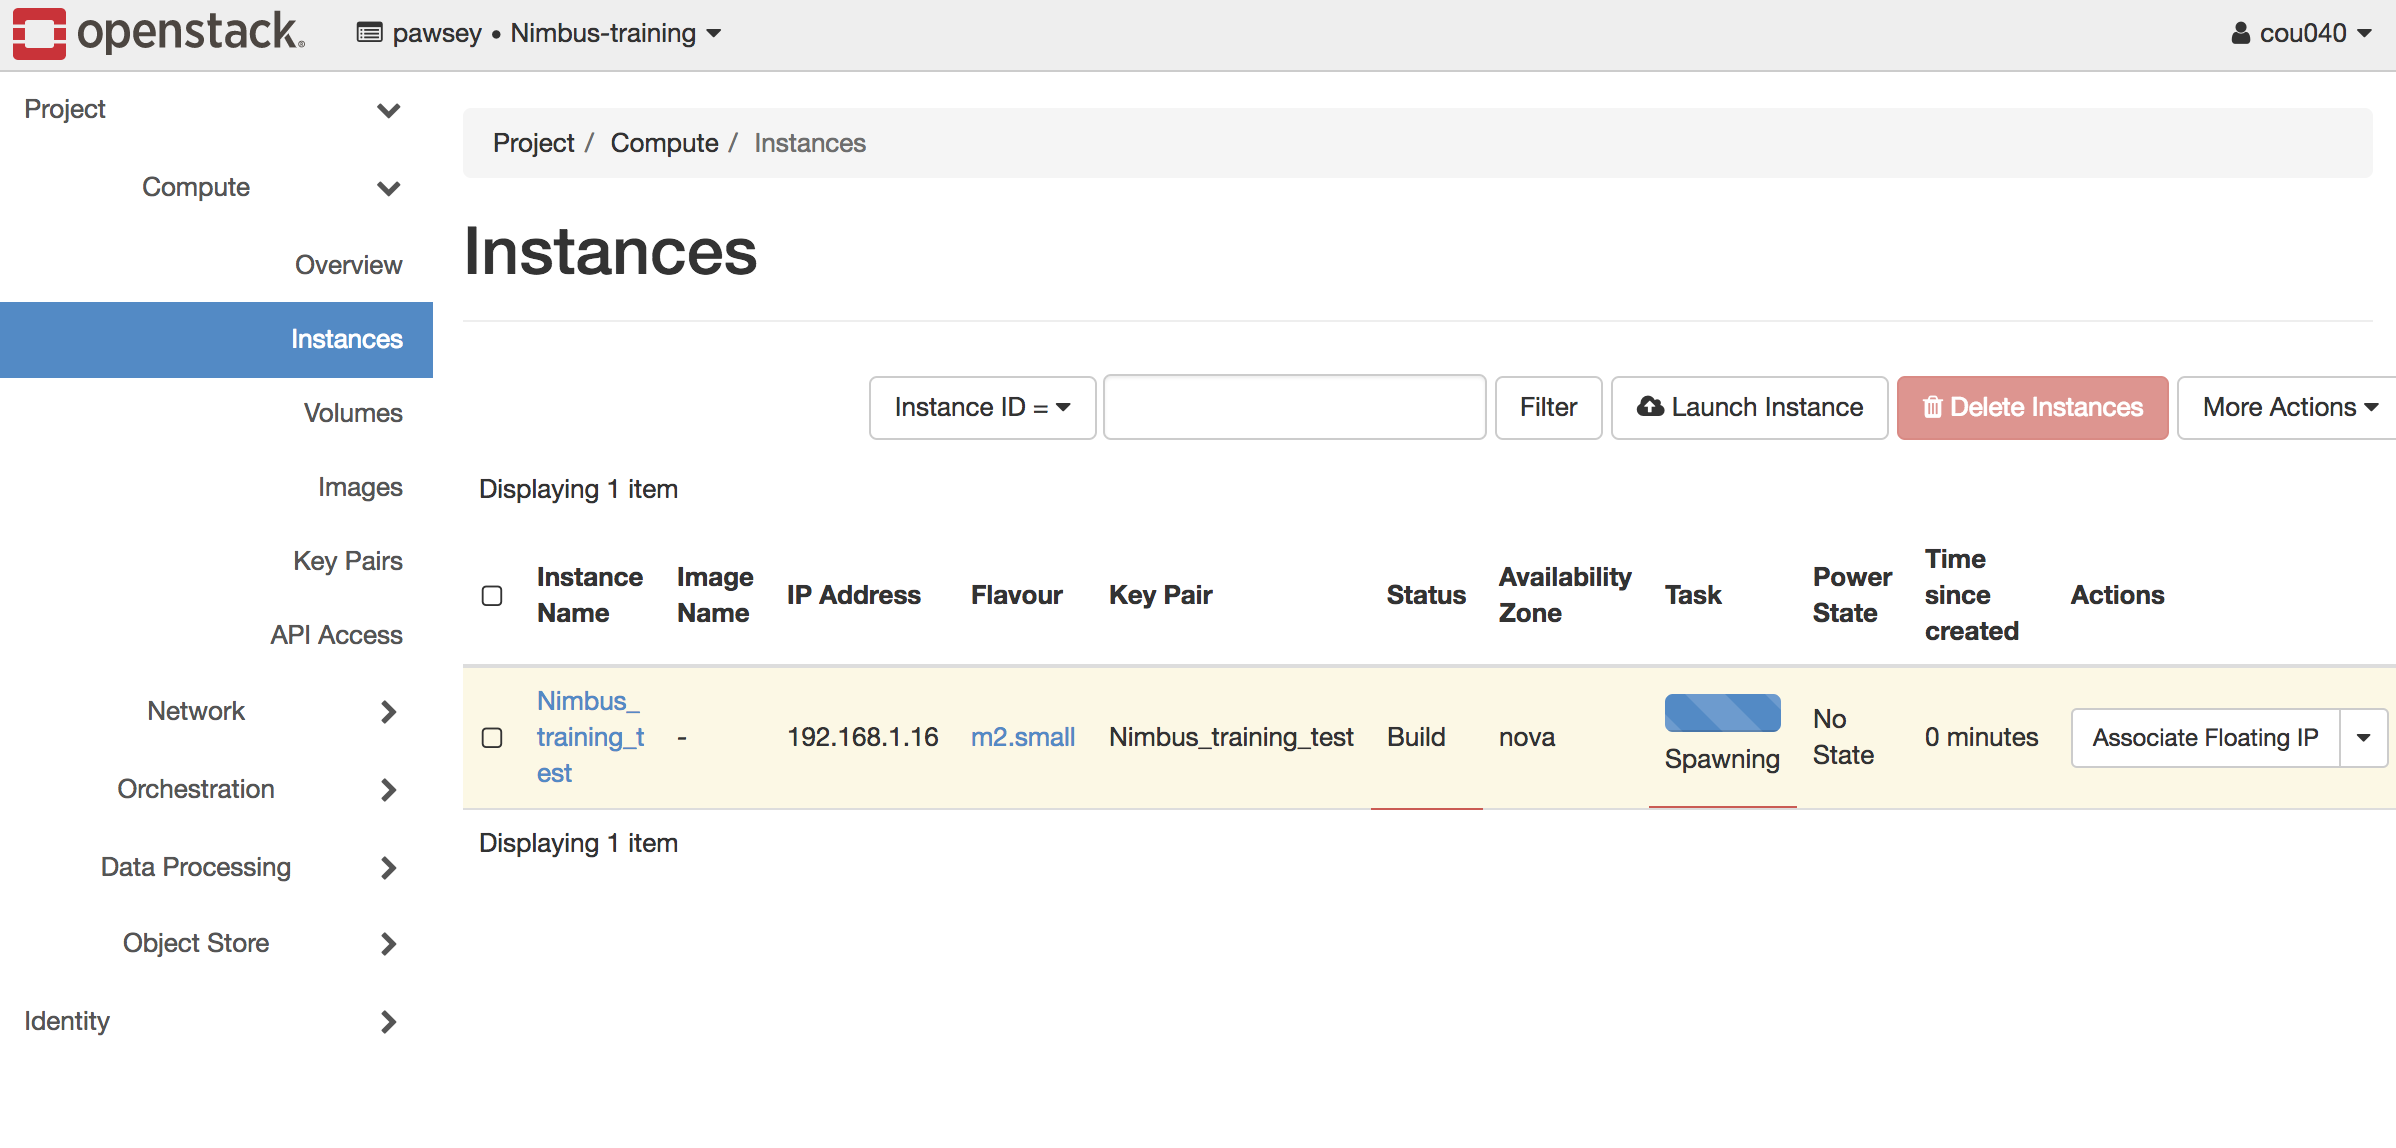
Let’s go!
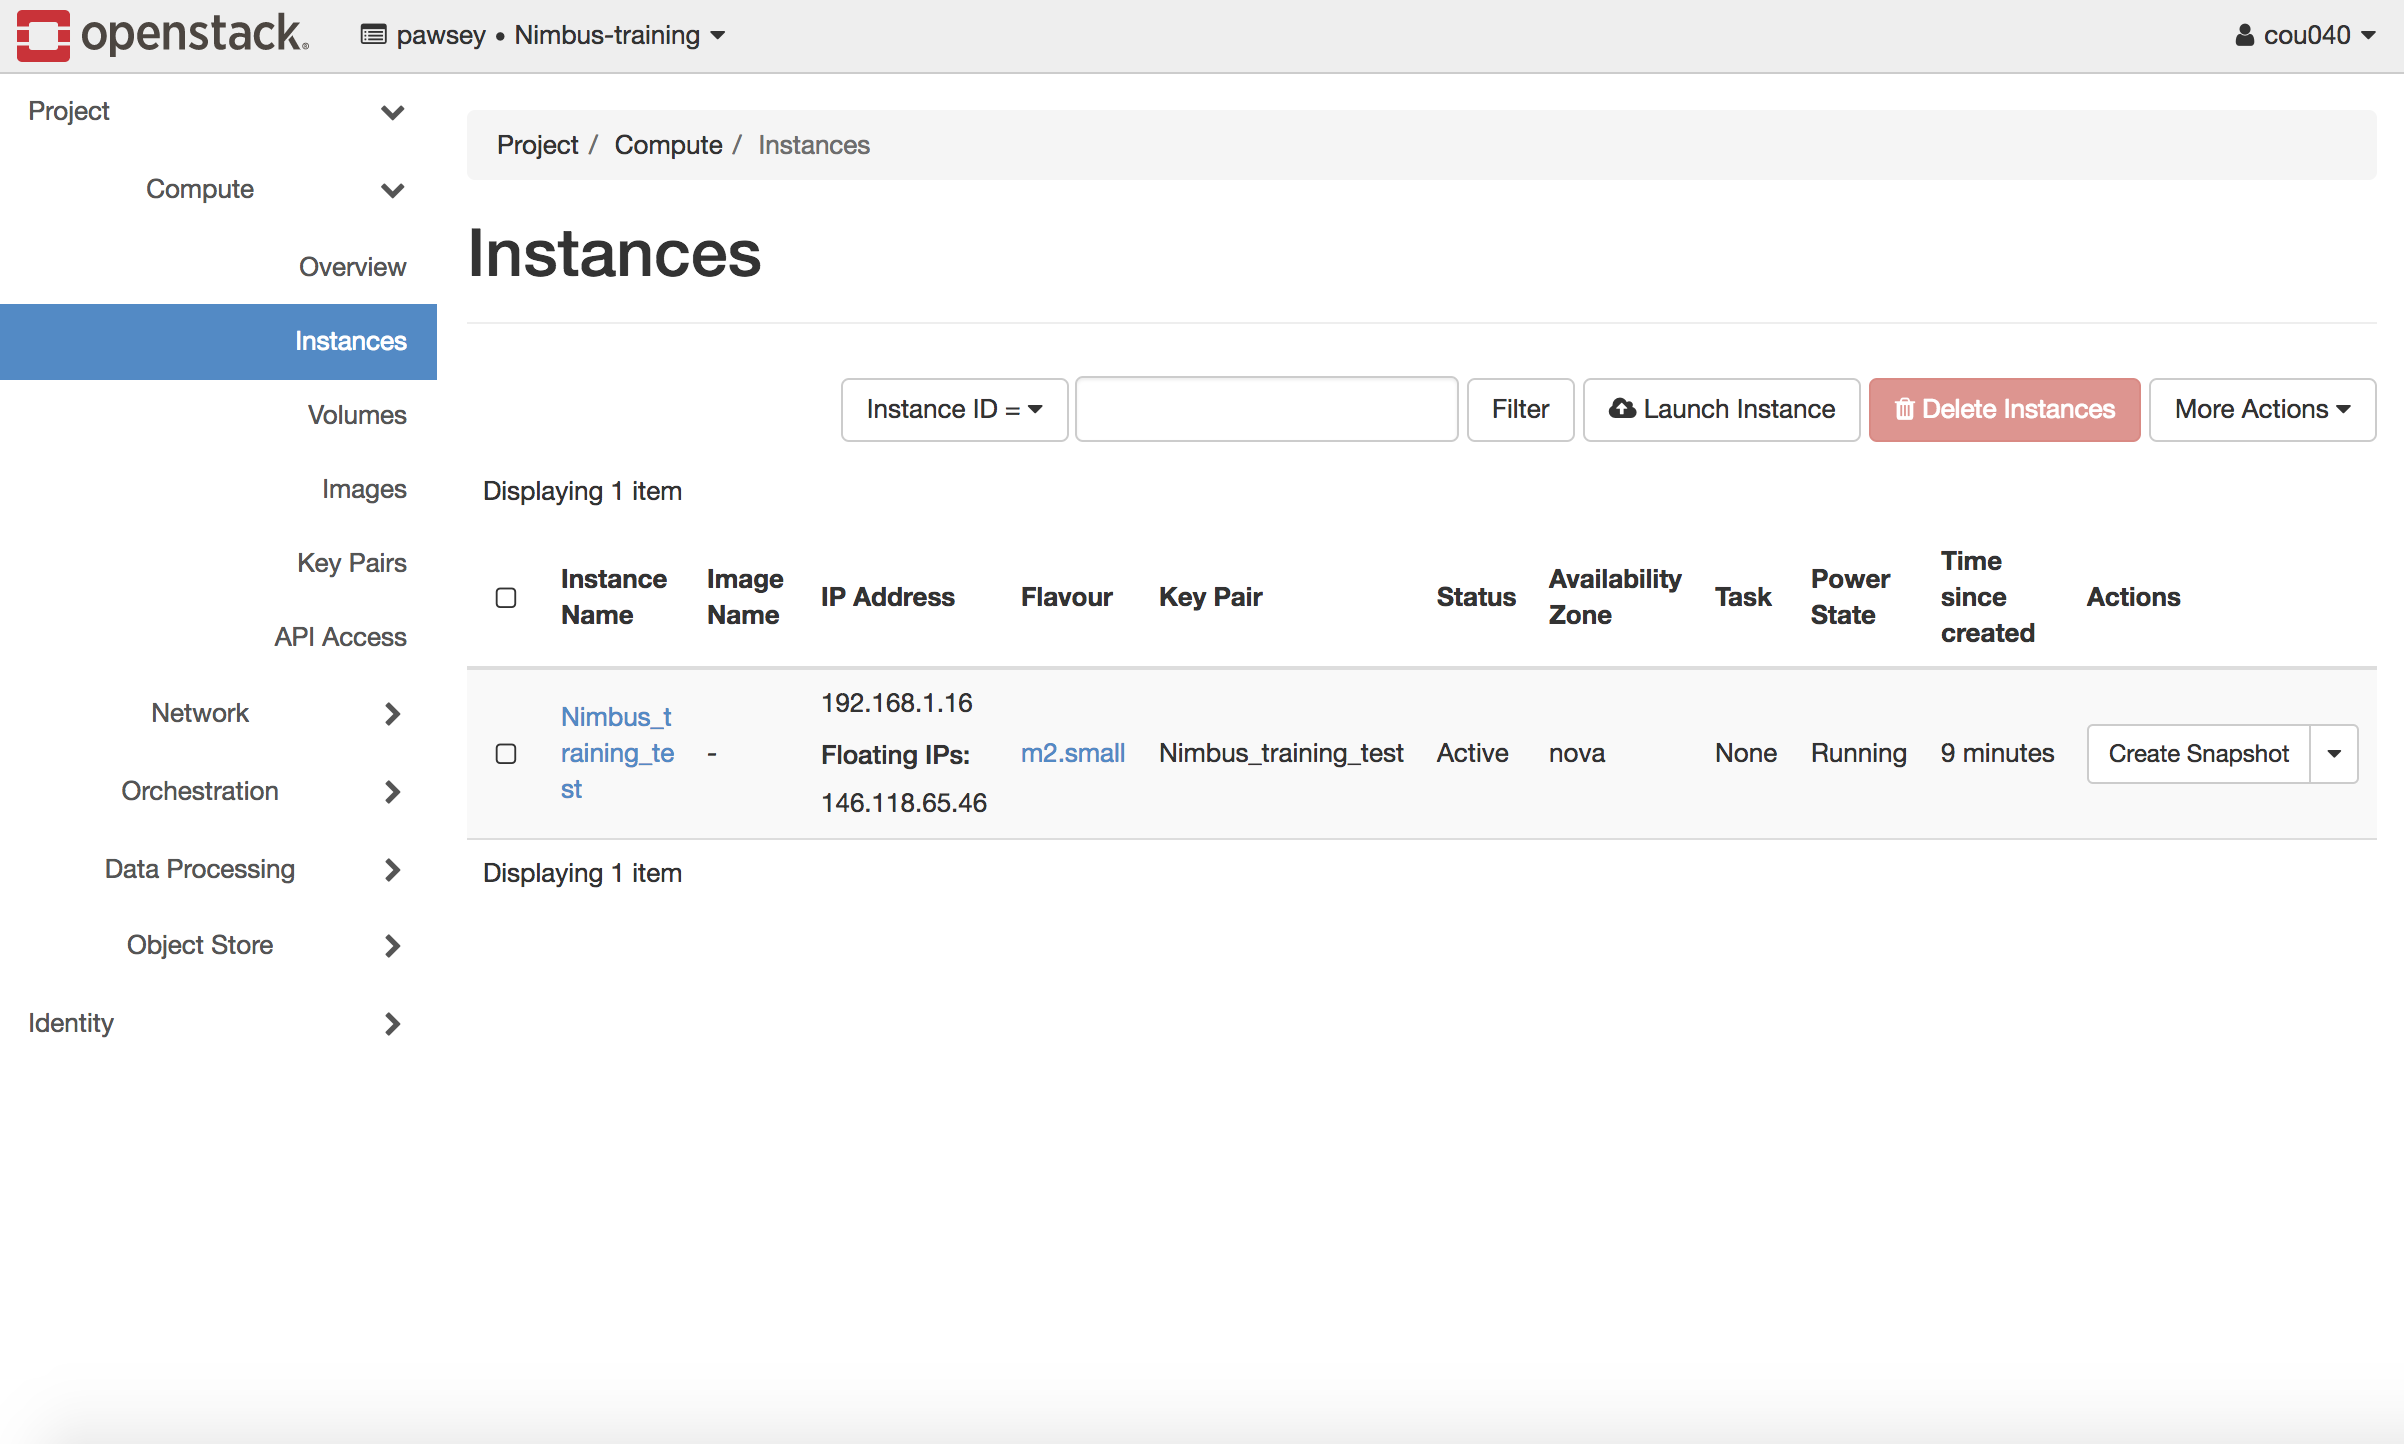
When you click Launch Instance you should see a new instance show up in your list (probably the only item you see listed). You will see it change state as it starts up.
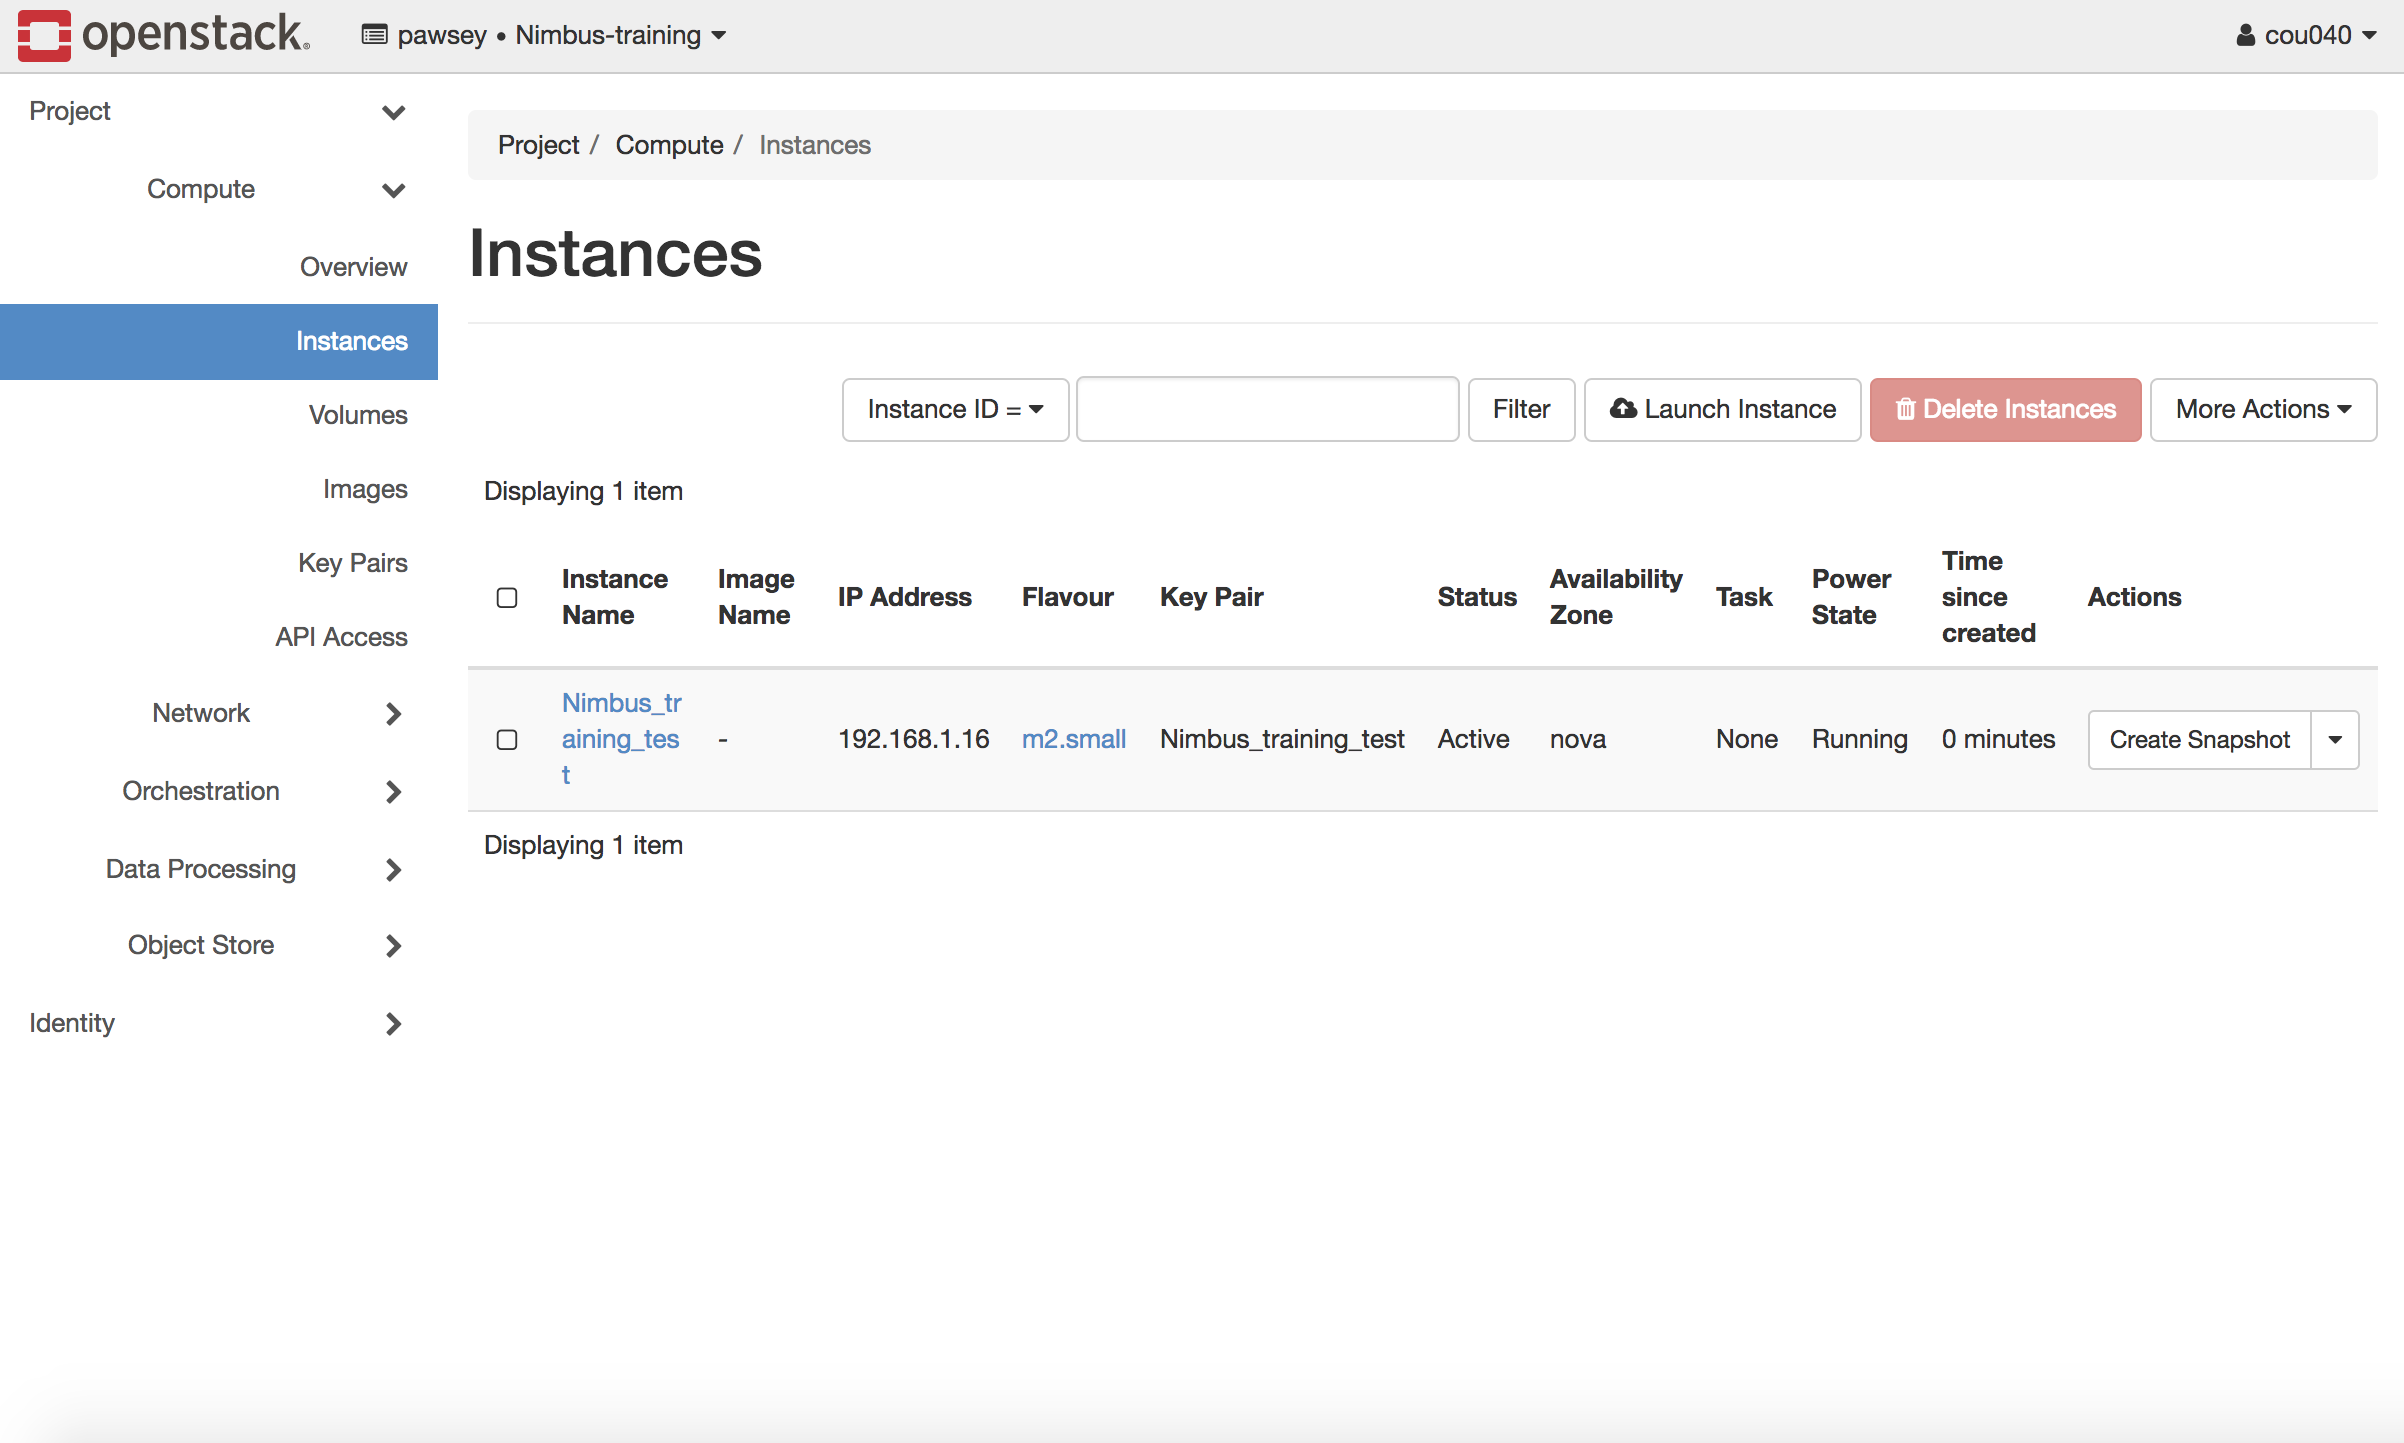
When complete, your entry should look like this:
What if something went wrong?
What did we do?
- Selected an image and flavour
- Selected a network
- Selected a SSH security group
What can go wrong?
- If your VM does not start and gives an error message: You might have selected the wrong network.
Now let’s give the VM an IP address
An IP address is a unique number that identify your instance and allows you to connect to it from anywhere on the internet. We need to select one to use in the VM, only once this is done can we actually login to a VM.
Go your VM listed in the Instances view. If you open the menu on the right side of the VM entry you will see

If you select Associate Floating IP you will see this:

Click the + button and you will see the Allocate Floating IP view, here you should click Allocate IP and you will now have an IP number you can use.
Managing a VM
Let’s have another look at that instance menu, because there’s a lot there. This is where you will perform the key management activities for your VM.
Let’s log in
Now, back to your terminal window to login to your instance:
- We will access our instances using a Secure SHell (SSH) connection.
What you need:
-
Your instance’s IP address -> get this from the instance overview in your dashboard ###.###.###.###
-
Your login_name -> this depends on the name of the Linux OS image you selected Login names:
Fedora/Centos/Scientific Linux fedora/centos/root Debian debian Ubuntu ubuntu -
The location and name of your private key pair (if you are using Windows and Putty) My_Key_Pair.ppk
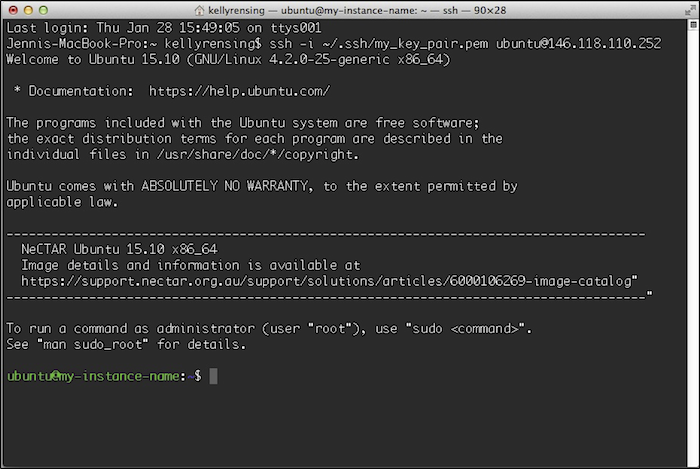
If you’re using Linux / Mac / Unix
$ ssh login_name@###.###.###.### or (if you have more than one private key) $ ssh –i ~/.ssh/My_Key_Pair.pem login_name@###.###.###.###
If you’re using Windows
1) Open Putty 2) Under “Host name (or IP address)” put: login_name@###.###.###.### 3) In the menu on the left, expand “SSH” and click on “Auth”. 4) Under the section “Authentication parameters” click on “Browse…”. 5) Select your previously create .ppk private key. 6) Click on “Open” to start the connection to your instance.
If it all worked…
Key Points
You learnt how to start an instance using Openstack and the Nimbus Cloud;
You learnt how to connect with an SSH client to a Linux instance.